
How To:
First Start | Setup
Scope:
This page will give some basic set up guides, wiring diagrams and first start information.
The first section will cover hard wired trackers
The second section will cover battery trackers
DISCLAIMER | Please read carefully:
Installing hardwired GPS trackers should only be done by qualified auto electricians.
LMS has a list or recommended installers you can find in the website footer “Stockist and Installers”.
Attempting to install LMS trackers without the correct qualification or competency’s can result in irreversible damages to the GPS hardware and or vehicles/equipment.
Electrocution risks are present when dealing with any form of electrical components, equipment or systems. Failing to isolate and deenergize electrical circuits correctly before commencing work can cause serious injury or catastrophic damages to hardware and/or equipment.
Always consult with a qualified auto electrician.
Please refer to LMS Terms and Conditions, Terms of Service, Policy’s and Waivers found in the website footer.
All LMS trackers come preconfigured and preactivated out of the box with a 4G global sim card.
All hardwired trackers provided by LMS require a minimum positive and negative 10-30v DC electrical connection to provide the minimum capabilities of the GPS hardware.
All hard wired trackers have a dedicated DIN1 / yellow ignition wire and we strongly recommend connecting upon installation to gain increased functionality from the GPS tracker.

All hardwired trackers have a wiring pinout printed on the outer case of the tracker as displayed in the example photo.
Pinouts will vary depending on the features and functions of each tracker.
You can also find IMEI number and S/N number printed here as well.
NOTE: IMEI number is required for product registration.
When installing a new tracking device, please be sure to fill out an installation sheet and attach to the production registration from located on the home page of this website.
Installation Orientation
We recommend to install GPS trackers flat with the Teltonika Logo facing the sky to allow better functionality of the accelerometer and other features.
This will also improve GPS and GSM signal on devices with internal antennas.
We also recommend not to install the tracker next to or near wiring looms or around high current devices as this could cause interference.
Please view the images below for orientation and installation location in the dashboard.


Below are links to wiring diagrams associated with each tracker currently supplied by LMS.
After Successful installation
Once the device has been installed, it will usually become active on the platform with in a few minutes but can take up to 24 hours.
Some factors that can cause delays in initial activation are:
Vehicle or equipment location, make sure the tracker is in an open area with clear view of the sky.
Tin roofs, sheds, metal structures, tall buildings, trees, over head powerlines etc can all block or limit GPS and 4G reception.
We recommend after installation to take the vehicle for a drive around the block to allow the GPS antenna to gather as much information and connect to as many satellites as possible.
If you still have issues getting the tracker to connect to the platform, please see our trouble shooting guide
Battery / Plug n Play Trackers
If using an FMC003 (OBDII tracker), locate your OBDII port under your vehicles dash board and plug in the tracker. (most commonly found in the driver side foot well).
Please refer to vehicles owners manual for location


If using a TAT240 Battery tracker, Make sure the device is firstly switched on. Then mount the device on a service that allows the tracker to have a clear and unobstructed view of the sky to maximise GPS and 4G signal.
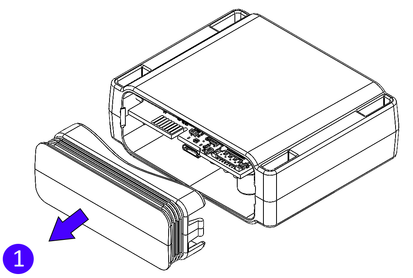
Remove front cover

Turn on tracker

Replace front cover