Manager Account
Scope:
This guide will give you the basic understanding of how to operate a manager account including account creation, object allocation and final account preparation for the end user.
Before you begin, you will need to have a basic understanding on how to navigate and operate a basic admin account first.
Please see our first start platform guide here —> First Start Platform Guide
Creating a new account
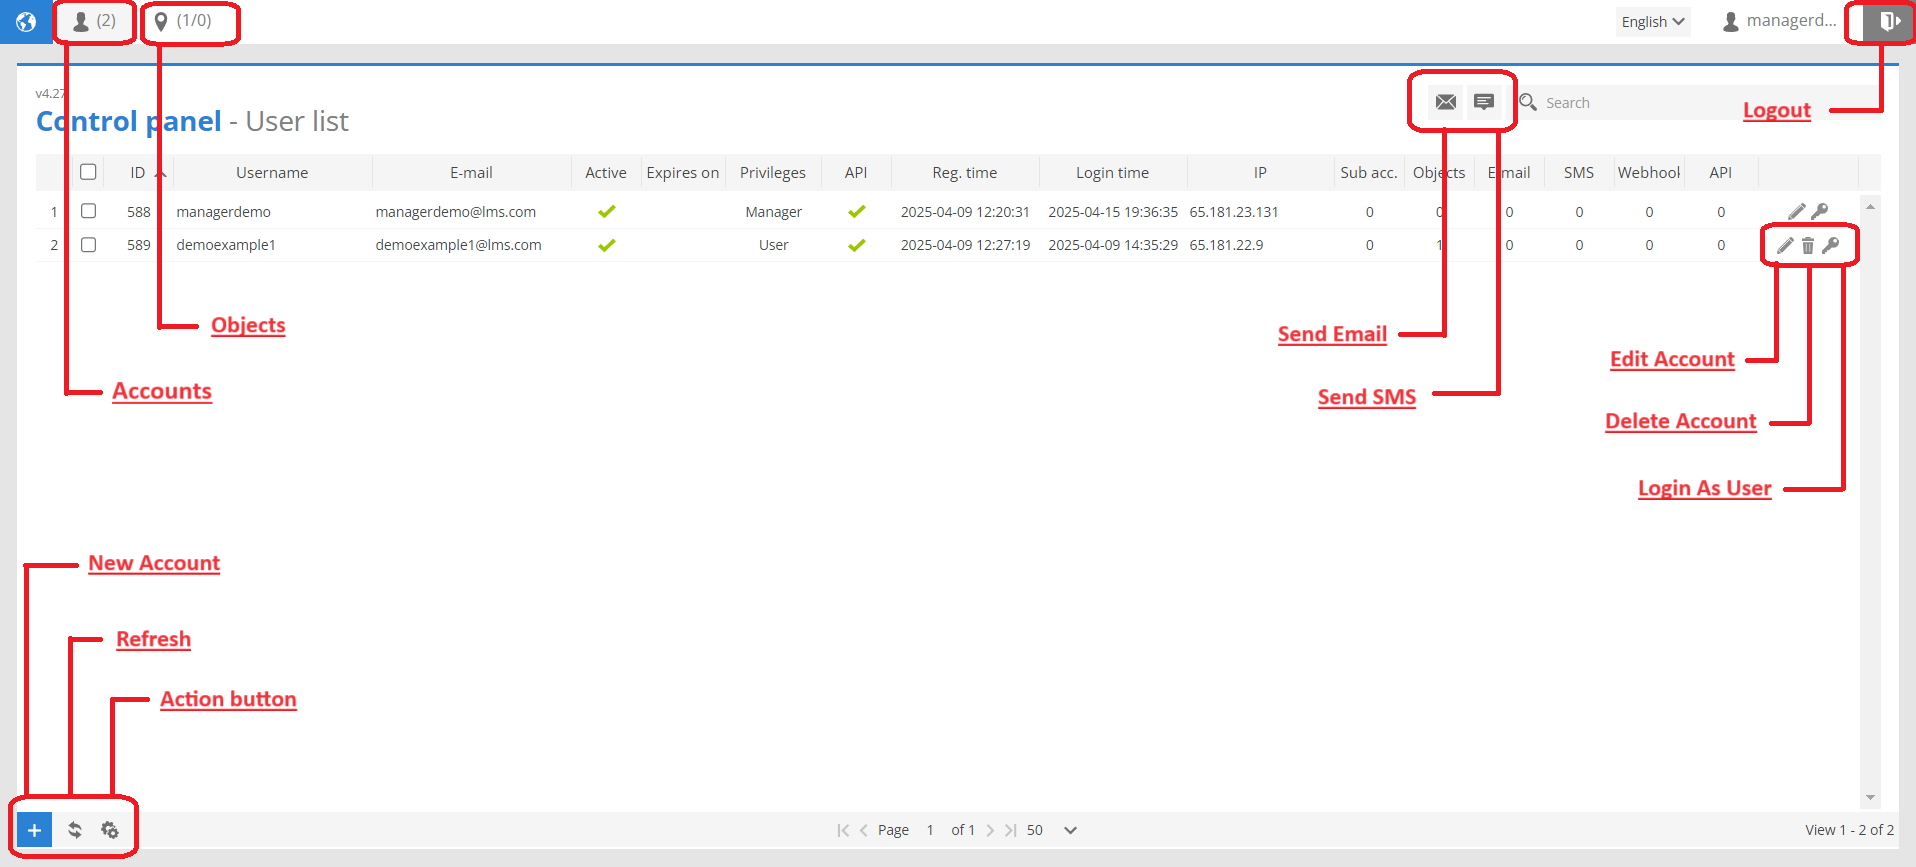
After receiving your new login details for a manager account from LMS, please go ahead and login using the same portal

The main page will look as the image below
Adding New Account
To create a new account, click the new account (blue + icon) at the bottom left of the home screen.
When the small window opens, enter a email address for the new account and click register.
The new account will now show on the main menu page.
To edit the account details, click the pencil icon on the right.
In the user section, you can modify the account details and reset the password.
It is strongly recommended to also disable the “Edit Objects” privilege so only the account admins can update these details.
First Way:
Second Way:
Add Events
Firstly, from the home page, open 1.settings > 2.Events > 3.Action > 4.Import.
Select the sensor file you just downloaded, usually in you’re downloads folder labelled “DSM Sensors.sen” and click open.


The next tabs along in the account settings allow you to:
Fill out contact information
View, Activate and deactivate sub-accounts
View, add and edit objects
And view account usage

Adding / Removing Objects
There are two ways to add or remove objects from an account.
Firstly, this can be done via the Objects tab under the account settings window as shown in the creating account section above.
The second way is the objects page via the main page top tool bar.
Open up the account settings via the pencil icon as per previous instructions and select the objects tab.
Now click the add (+) icon down the bottom left of the window.

In the new window, start typing the object name, IMEI or sim number. If the object exists, it will show up below and you can click to select.
Once you select the object, you can now add another or click the add button at the bottom of the window to complete the process.
The object will now show up under the account and you can click the pencil icon to edit the object details or the eraser icon to the clear the object history.
It is highly recommended to clear the object history if moving to a new account; if not done so, the new account will be able to see the object history from the previous usage.
The second way to add an object to an account is to open the objects page from the top menu bar of the main page; then select the pencil icon next to the object you want to add; now down the bottom of the object window, start typing the account name.
Select the account and make sure to click the save button and you’re all done.
Final Account Preparation
It’s now time to put this finishing touches on the account for the end user.
From the main page, select the key icon on the new account to login as user
Once logged into the new user account, it will look almost the same as any other account except you will notice an orange gear icon near the top right of the screen, this allows you to logout and return to the manager page.
To import a sensor file, open:
1.Object settings > 2.Edit > 3.Sensors > 4.Action > 5.Import.


We have provided some prefilled events to save you some time. These include:
Basic DSM events, Drowsiness, Yawning, Distraction and Phone usage
Crash detection
Harsh braking and Accelerating
Seat belt alert above 30kph
Low battery voltage
Battery disconnected / device unplugged


Locate and select the event file, usually in the downloads folder and click open.
Confirm the import by clicking “YES”

Now all the events will show up in this window.
You will now have to allocate the objects to each events and adjust the notification settings if required.
Click the pencil icon next to each event to edit these preferences
In the main tab, select the object drop down tab and select all objects


Then click overt to the notifications tab to add in any email addresses or phone numbers


Enable Push Notification

Enable push notification on the user account setting to make sure alerts come through the mobile app
Check Object Sensors
We have provided an object DSM sensor file if there are no sensors present on a object
Double check sensors have been imported to each device. From the home page click: 1.Object settings > 2.Edit > 3.Sensors.
If no sensors are present, download the sensor file above and follow the next steps below.
Confirm the import by clicking “Yes”
The sensors will now display in the object and make sure to click save before exiting
Add Reports
Events Report
Open the reports tab via the main tool bar and click the add (+) icon down the bottom left.
Give the report a name and then select the type in the drop down menu as “Events”
Allocate the objects to the event in the objects dropdown box
Select the data items required to show on the event
If you would like this report to be automated, select the daily and/or weekly options then input an email to send too.
Now select any additional available settings in the top right section.
The blue section highlighted can be left as is. If you would like to generate a report for a specific date/time, you can input these details and click generate at the bottom; but for now simply click save and your done.
The report will now show up in the main reports window.
On the far right you have the options the generate now, edit or delete.
And to view any previously generated reports, click the generated tab in the top bar.
Drives and Stops
Follow the same steps as the previous reports to set up the schedule and additional settings.
Then click save.
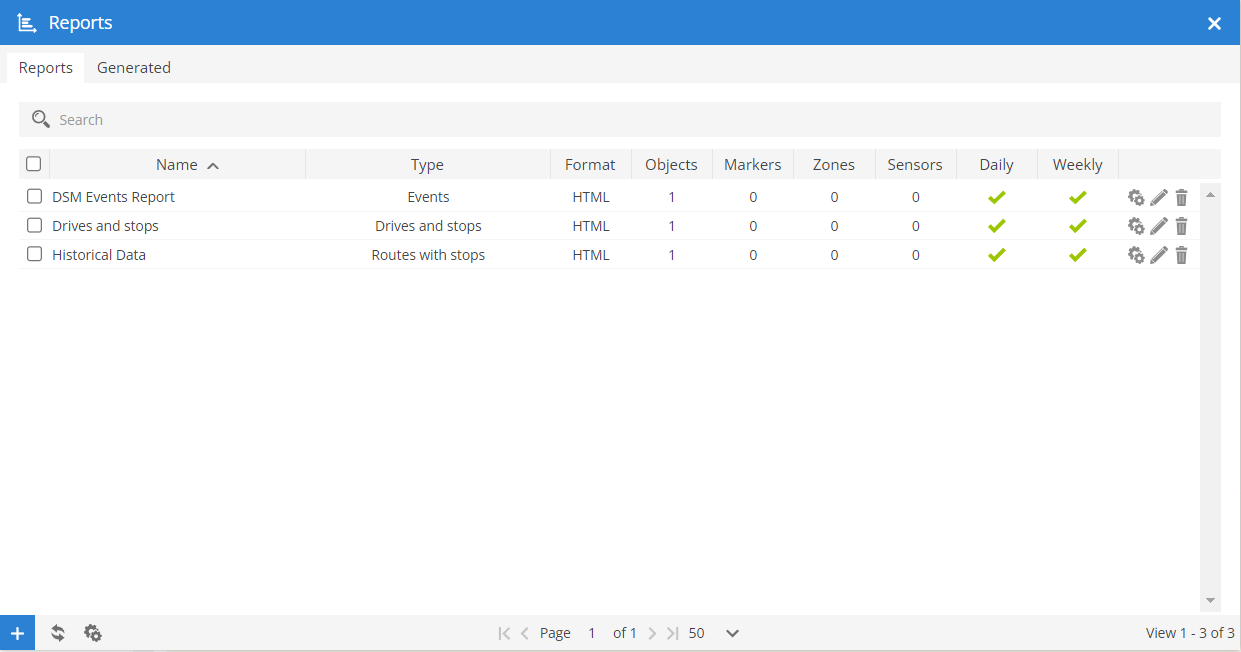
Once finished, your reports window should now look similar to this.


Adding reports can be very valuable for the end user, especially when operating a DSM IVMS system on a mine site as this is some times required.
The three basic reports we will setup are:
Events Report
Drives and stops
Historical data
These three reports will cover 90% of most clients needs.


Open a new report by clicking the add (+) icon.
Give the report a name, select the type (Drives and Stops) and the objects.
Then select the data items required form the drop down menu.
Now fill out the schedule to automate this report and select any additional settings in the top right section.
Now click save.

Historical Data Report
LMS only hold 90days of server data currently, this means if you require any data older than 90days, you will need to make sure the reports are set up correctly.
The historical data report combined with the other two reports will cover most data required to have a good under standing of the vehicle data out side of the 90days.

Open a new report and giver it a name.
The select Rousts with Stops as the type.